When you want to set up your own secure website on a custom domain, there are quite some steps you have to follow. This blog will be step 1 of a 2-part post.
In this post we will first set up our website running WordPress. In the next post, we will link this website to our custom domain and make sure we can access it over HTTPS with a valid certificate
Steps to create the website
- To set up a WordPress website you can select ‘WordPress’ from the Azure Market place and select Create
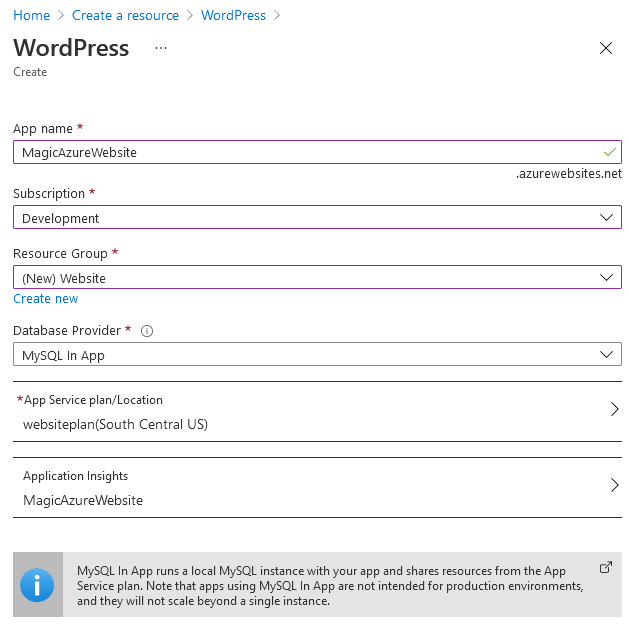
- now you will be prompted to answer the following:
App name:This will be the name of your website. In my case: MagicAzureWebsite.azurewebsites.netSubscription:The Azure subscription where you want to host. In my case: DevelopmentResource group:location where to store the resources. In my case: WebsiteDatabase provider:you can choose either a separate database, or to save costs follow my example and choose: MySQL in AppApp Service plan:by default this is set to a production grade. To save costs for a personal blog, click the arrow on the right, then select create new. Now you can give your plan a name (in my case: websiteplan), a location and a pricing tier. The minimum tier you need is a B1 tier (that is hidden under the Dev/Test tab). With lower tiers you will not be able to link your custom domains and access them via HTTPS later.- Finally you can either accept the
Application Insightssettings, or turn them off if you want to - Setting will look like the screenshot below. Now you can press
create

Now your deployment starts and creates the website for you. After a couple of minutes your website will be available. Now you can open a browser window and visit your website via: https://magicazurewebsite.azurewebsites.net. There you will be prompted with the default questions of a WordPress installation.
Before spending time on the configuration of WordPress it is important to set up the security for your website. The installer above created an Azure Appservice for you named MagicAzureWebsite. When you browse to this resource please go to TLS/SSL settings. There it should mention that your website requires a minimum TLS version of 1.2. This is the desired setting. Unfortunately the default setting for HTTPS Only is set to OFF. This should be turned ON. After switching this setting to ON, all HTTP requests are automatically redirected to HTTPS.
I had never used WordPress before and had a first version of my website up-and-running within 30 minutes
The next steps will be described in part 2


